01 Case study
Design Prototyping plugin
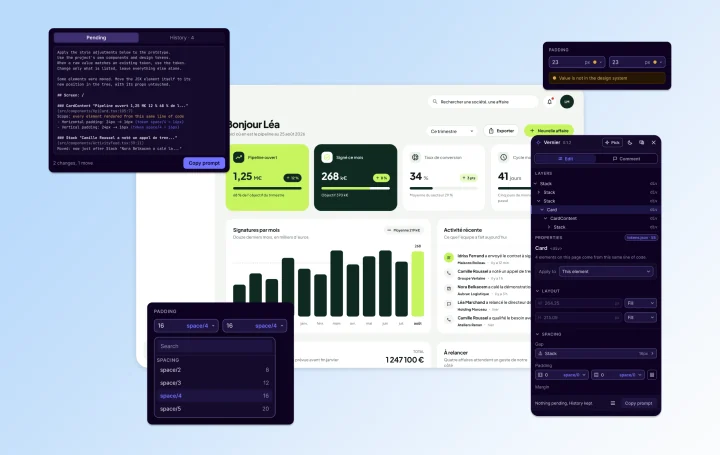
Design System Lead at Kls. Alongside the restructuring of the design system, I designed and built Vernier: a visual editing panel that makes iterating on prototypes in the codebase as fast as it is in Figma.
- Role
- Product Designer / Design System Lead
- Company
- Kls
- Year
- 2026
- Tools
- Figma / Claude Code / Vite / React / TypeScript
- Focus
- Design engineering / Design ops / Design system / AI design
Context
Kls builds debt management software for banks and financial institutions. A dense, heavily regulated domain, where screens handle considerable volumes of information: a case-tracking table does not behave the same way with ten rows as it does with ten thousand.
I joined the product team as Design System Lead, with the complete restructuring of the design system as my main mission.
One particularity of my role at Kls: I have access to the codebase. I don’t only produce mockups, I prototype directly in the product’s code. What we test looks like what will ship, not like the clickable approximation we used to get from Figma prototypes.
This way of working would not hold up without a coding assistant. I use Claude Code every day: it writes the code I could not write myself, from my intentions as a designer.
Audit
To pin the need down properly, we looked at three angles:
Current problem
Visually adjusting a prototype goes through language alone. Every micro-change means describing the element, waiting for the assistant’s reply, then checking the result. The cost of each adjustment is out of all proportion to what is at stake.
The objective
Bring the speed of a design tool into the prototype in the codebase: select, adjust, see. Without leaving the browser, and without going through a sentence.
Secondary objective
Make sure the values produced are those of the design system, not arbitrary ones, so that the prototype stays a reliable source rather than a pile of hard-coded values.
Where things stood
The problem made itself obvious after a few weeks of prototyping.
One example among a hundred: changing a spacing from 20 to 24 pixels. In practice, that meant writing a prompt, naming the element precisely to remove any ambiguity, waiting, then looking at the result. For a two-pixel adjustment. Multiplied by twenty on a single screen.
In Figma, the same gesture takes me a few seconds. The gap was not in my skills, it was in the tool I was using.
Two further frictions came on top:
First, losing context. The browser’s inspection tools let you change values on the fly, but everything vanishes when the page reloads. There was no way to build up adjustment work across several screens.
Second, drifting out of the system. When you describe a value in natural language, you describe a number. But in a design system, 24 pixels is not a number: it is a token. Nothing guaranteed that the requested adjustment would become the right token rather than a hard-coded value.
I looked at what already existed. Several tools come close to the need, but each stumbled on one point: either they write changes straight into the files, which is risky on a production codebase, or they only work on a technical stack different from ours, or they ignore the notion of design tokens entirely.
None of them fit the way we work 100 %.
Designing the tool
So I defined the tool I needed, starting from what I know best: Figma’s properties panel.
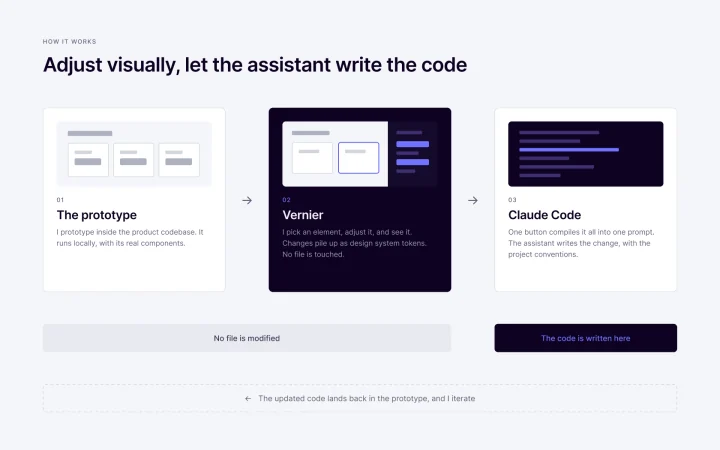
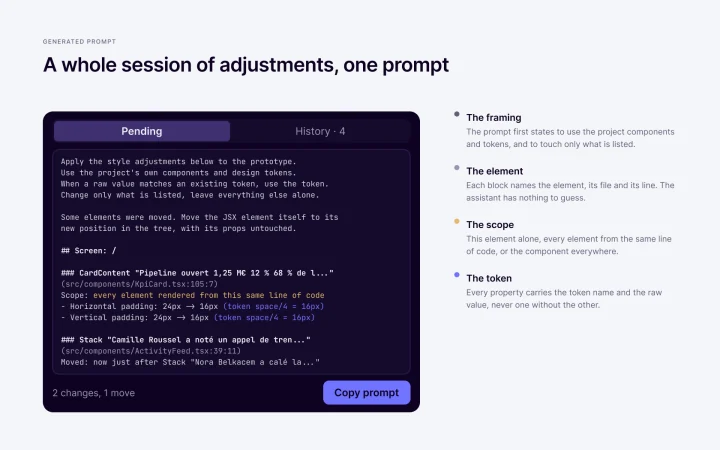
The founding principle, and the most structuring decision of the project: Vernier never modifies the code. It applies adjustments visually, in the browser, and accumulates them. At the end, a button generates a single prompt describing the whole body of work, to paste into my Claude Code session, which carries out the actual change.
That choice solves three problems at once. No risk to the codebase, since nothing is written. The freedom to iterate before committing, as you would on a mockup. And above all, the final change is written by the assistant, which knows the project’s conventions, rather than by a tool that would drop in raw values.
I then specified the expected behaviour point by point: which properties to expose, how to choose the scope of an adjustment, persistence across screens, reverting to the original values. Then I built the tool with Claude Code, working in batches and testing at every step.
What Vernier does
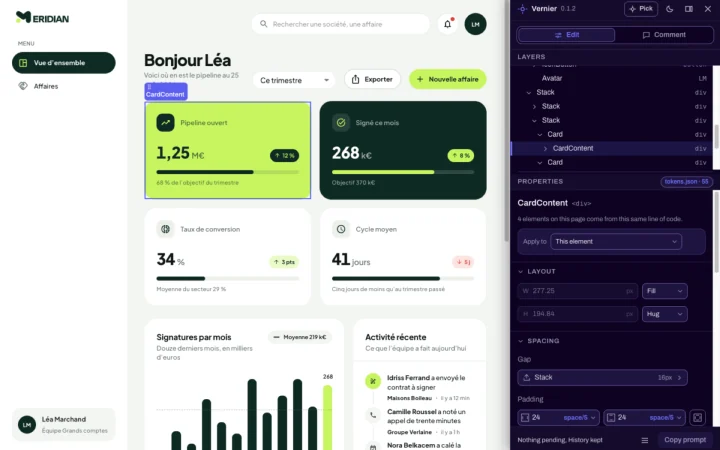
A properties panel inside the page. Vernier opens to the right of the prototype, without leaving it. I click an element and adjust its dimensions, spacing, typography, colours, radius, and so on. The page updates immediately.
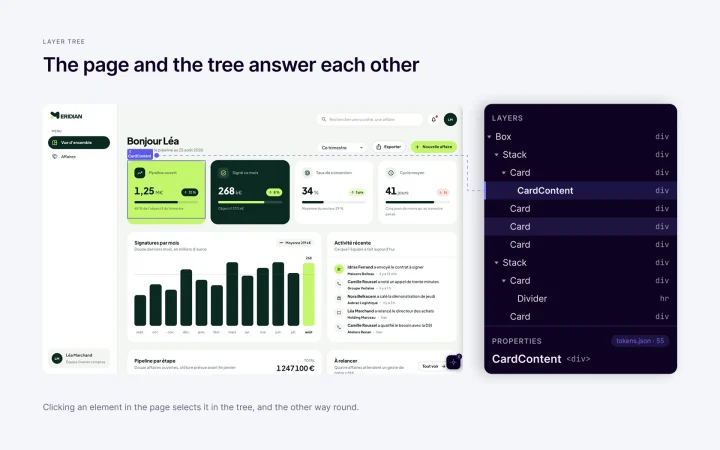
A layer tree. Navigating a dense interface by clicking alone quickly becomes tedious. Vernier exposes the element hierarchy like Figma’s left-hand panel, with cross-highlighting between the tree and the page. I can also move elements around directly with the mouse.
The design system’s tokens. This is what sets Vernier apart from a plain inspector. The panel reads the project’s token file: when I set a spacing or a colour, I pick from the system’s palette, and it is the token’s name that goes into the prompt, not a hard-coded pixel. Free input is still possible, but it is flagged as stepping outside the system.
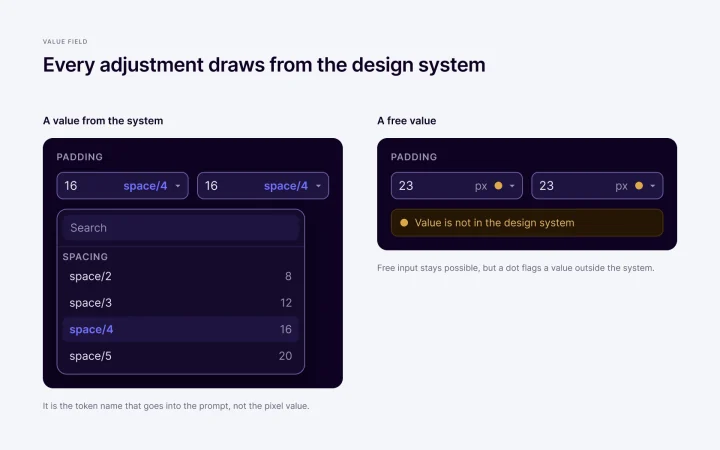
Choosing the scope. An adjustment can target this exact element, every element produced by the same line of code, or the component wherever it is used. The distinction is essential: widening a table cell has to affect the whole column, not one isolated cell.
Persistence. Adjustments build up from one screen to the next and survive a page reload. I can work through a whole session before committing anything.
A single prompt. At the end, one button compiles everything: each change, its scope, the file and line concerned, the token chosen. One prompt to paste, instead of twenty round trips.
Conclusion
What used to take me ten minutes now takes two. The gain is not only time: it is being able to iterate without weighing the cost of each attempt, which changes the very way I work on a screen.
A side effect I did not expect: because adjustments are accumulated and sent in one go, the assistant’s consumption drops noticeably. One prompt instead of twenty.
More fundamentally, this project confirmed something about my craft. Faced with a daily friction, the reflex was not to go looking for a licence, but to see whether we could build the solution that fit best. Similar tools existed, but none answered our context completely. This one does: it is made for our prototypes, our design system, our stack.
I invented nothing and revolutionised nothing. I had a concrete problem in my daily work, and I fixed it.
Testimonial
« Proud to see that after only a few months at Kls, Tom Berruyer has already taken on board that tomorrow’s work is not yesterday’s. He could have kept basing all of his work on a tool he masters perfectly. Instead, he carries forward our work on how we operate, enriching his environment rather than standing still. »